Remember that if you want to connect to the logger to update the firmware, you'll need a USB to serial converter that provides 5V power and 3.3V logic: this is not universal (if you feed the logger with 5V data, you'll likely destroy it).
The current converter used is an Adafruit FTDI Friend. Looking at the board from the component side, it plugs into the pin header to the right of the microcontroller, with its components facing to the right (check the silk-screen on WIBL and converter to confirm GND pin position). Check that the firmware is updated and flash it with the appropriate metadata. If the metadata is not preloaded onto the logger, it can be fixed during [WIBL Data Processing](https://cms-kb.marine.usf.edu/books/crowdsourced-bathymetry-manual-2026/page/wibl-and-ydvr-data-processing "WIBL and YDVR data processing"). Instructions for updating the firmware and flashing the WIBLs can be found in the [WIBL Installation Guide](https://cms-kb.marine.usf.edu/books/crowdsourced-bathymetry-manual-2026/page/installation-guide-nemo30wibl "Installation guide: NEMO30/WIBL") section and on[ CCOM's WIBL GitHub page](https://github.com/CCOMJHC/WIBL). Bring a laptop with you, if possible. Plan to let the WIBL run after installation, pull the SD card, and check for proper function. WIBL data are not human-readable, so to check if it’s properly recording, you’ll have to run it through the appropriate python scripts (see [WIBL Data Processing](https://cms-kb.marine.usf.edu/books/crowdsourced-bathymetry-manual-2026/page/wibl-and-ydvr-data-processing "WIBL and YDVR data processing") for instructions). Prior to the installation date, direct the participant to the[ Equipment Check](https://crowdthebay-usfmarsci.hub.arcgis.com/pages/equipment-check) webpage and have them confirm that their vessel is set up with a NMEA. To help plan for the installation, it may be helpful to request photos from the participant of the NMEA location within the center console. After the installation is complete, the participant will need to handle the data hand-off. Send them a Box folder link (or another preferred file-sharing platform) and make sure that they can upload files to it. Ask them to wait to delete any items until you have downloaded them or transferred ownership to yourself. ## Yacht Devices (YDVR) If installing a YDVR, you will need to make sure the[ configuration file](https://drive.google.com/file/d/1Zmbg6OCpyknaXo4mNv05RbuuEzkRgcPt/view?usp=sharing) on the microSD card has the correct parameters specified. Open a text editor (e.g., Notepad) and copy the configuration below: ``` “CFGSAVE NMEA2000=ON FORMAT=DAT AIS=OFF DELETE=YES AUDIO=OFF COMPRESSION=OFF GAIN=2.70 DELAY=30.0 FILTER=ON THRESHOLD=2.50 PLAYER=OFF LOOP=OFF SILENT=OFF” ``` Save the file as YDVR.TXT to the root of the MicroSD card After the installation is complete, the participant will need to handle the data hand-off. Send them a Box folder link (or another preferred file-sharing platform) and make sure that they can upload files to it. Ask them to wait to delete any items until you have downloaded them or transferred ownership to yourself. **Example YDVR configuration file:** ``` # Voyage Recorder YDVR-04 (www.yachtd.com), serial number: 00000000 # Firmware version: 1.04 17/08/2018 # Settings in this file match the settings in device’s EEPROM # SAVE TO EEPROM # To save settings, rename this file to YDVR.TXT and remove # symbol # from the line below CFGSAVE # NMEA 2000 RECORDING NMEA2000=ON FORMAT=DAT AIS=OFF DELETE=YES IGNOREPGN= IGNOREADDR= IGNORE= SPEED=250K SILENT=OFF # AUDIO RECORDING AUDIO=OFF COMPRESSION=OFF GAIN=2.70 DELAY=30.0 FILTER=ON THRESHOLD=2.50 # PLAYER MODE (disables recording when ON) PLAYER=OFF LOOP=OFF # End of file ``` ## OFM Mussel Kit Make sure to contact [Orange Force Marine](https://www.orangeforcemarine.com/contact) with the date/time of the installation in case their support is needed. They can also check to ensure the logger is online, connected to the cloud environment, uploading data properly, and collecting valid depth and position data. Installation day requirements: - OFM Mussel Kit data logger (plus backup(s)) - Installation kit - Camera - Cell phone (for contact with OFM in real-time for installation assistance, or for using a hotspot) - 1-2 people (2 is best for metadata offset measurements, especially if you haven't done many installations previously)During installation, take pictures and videos of logger identification numbers, logger orientation, installation locations onboard the vessel, wiring configurations, and antenna placement. Photos can be useful for social media and marketing and also provide a visual reference for offset directions and relative positions of GPS and transducers.
# Installation Kit Prior to leaving for a logger installation, ensure that the installation kit contains the following: - [ ] NMEA 2000 T-splitters (single or 2-way) 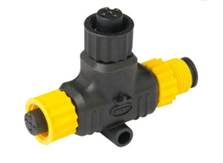 (single) 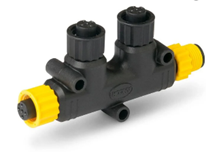 (2-way) - [ ] NMEA 2000 drop cables (1-m or 0.5-m, of the correct connector either 0183, 2000 type N or 2000 type R)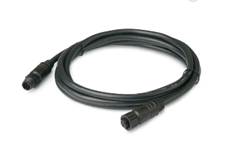 - [ ] Tape measure - [ ] Outdoor double-sided Velcro - [ ] Pens - [ ] Blank MOU (if not already filled out - see Templates for examples) - [ ] Offset worksheets (if not already filled out - see Templates for examples) - [ ] Metadata forms (if not already filled out - see Templates for examples) - [ ] Logger + backup (of the correct connector - either 0183, 2000 type N, or 2000 type R) - [ ] MicroSD card with Config file already loaded (linked YDVR here, example in Templates) Optional and backup supplies: - [ ] NMEA 2000 elbow connector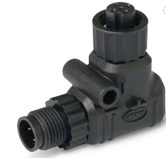 - [ ] NMEA 2000 terminator cap - [ ] NMEA 2000 power isolator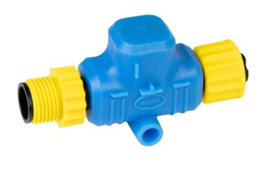 - [ ] Thru bolts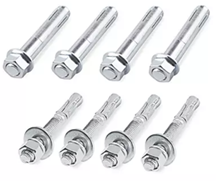 - [ ] Screw drivers - [ ] Pliers - [ ] Zip ties - [ ] Scissors - [ ] Electrical tape - [ ] Duct tape - [ ] Epoxy - [ ] Desiccant packets - [ ] Cleaning solvent - [ ] Cleaning wipes/rags # Installation guide: OFM OFM has provided detailed[ ](https://drive.google.com/file/d/1PFSkoR7dxEbR8IYzMDXWIndG62kcQlK4/view?usp=drive_link)[Installation and Operating Instructions](https://www.orangeforcemarine.com/s/Mussel-Kit-Installation-Operating-Instructions-Generation-2-January-2024.pdf) for their Mussel Kits. A hard copy will also be included in the shipment with the data logger. Be sure to contact [Orange Force Marine](https://www.orangeforcemarine.com/contact) with the date/time of the installation so they can be available to provide real-time / near real-time support. During the installation you will be directed to fill out a metadata table for the vessel (see pages 7-10 of the [Installation Instructions](https://www.orangeforcemarine.com/s/Mussel-Kit-Installation-Operating-Instructions-Generation-2-January-2024.pdf)), which can be completed manually on the printed sheets and submitted electronically[ here](https://docs.google.com/forms/d/e/1FAIpQLSdsOATPpHmrYqy0GpDm-pQeFsKnTIMXlF5pHu63Xm1Rfv4gqg/viewform). When the installation is complete, [contact Orange Force Marine](https://www.orangeforcemarine.com/contact) to confirm that the logger is online and working properly. # Installation guide: YDVR 1. Locate a NMEA 2000 backbone or T-connector with an open port. If a port is available, simply plug in the logger’s Micro Male connector. If all ports are occupied, add a new T-connector to the backbone before connecting the logger. 2. Ensure proper termination: the two ends of the backbone must each have one terminator. Any unused T-connector ports should be capped. 3. Secure the logger in a dry, protected location away from bilge water or spray. 4. Confirm network power (10.5–16 V) is present before connecting. 5. Lock the connector collar to maintain water resistance. 6. Insert the MicroSD card into the logger until it clicks into place. 7. Connect the vessel’s NMEA 2000 power or turn the system “on." 8. Observe the **LED indicator** at the end of the logger: 1. - **1 green flash (1 second)** = file created, ready to record - **3 green flashes (0.5 seconds apart)** = receiving NMEA 2000 data (correct installation) - **Constant green flashing** = actively recording - **Red flashing** = indicates error (no card, wrong format, or write issue) 9. When powering down, a **short red flash** confirms safe file closure. 10. Data are stored automatically in folders named YDVR#### on the MicroSD card. 11. To retrieve data, remove the card, copy files to a computer, and process with YDVR Converter software (available for download [here](https://www.yachtd.com/downloads/YDVRCONV.zip)). # Installation guide: NEMO30/WIBL 1. Confirm that the NMEA network starts when the vessel is powered on. 2. Remove the backplate/cover of the logger. 3. Check to make sure the logger has an SD card for data storage and that it’s clicked "in".  (disengaged)  (engaged) 4. Place 1-3 desiccant packs into the logger. It’s okay for the packs to rest on the circuit board. 5. Put the cover back on the logger. Zip-tie the two opposite corners to secure the plate. \[Note: when copying data, these zip ties will have to be cut and redone each time\] 6. Locate the NMEA network hub. If there isn’t an empty port, swap in a T-splitter if needed. 7. Determine the best placement for the logger within 1- or 0.5-meters (depending on drop cable length) of the port. 8. Before placing the Velcro to mount the logger, ensure no pinching, blocking, or other clearance issues will happen when closing the console. 9. Use 2 strips of Velcro at the mounting site and on the backplate of the logger, alternating rough and smooth sides.  10. Connect the logger to the NMEA network with the drop cable. Make sure the locking threads are tightened on both sides. 11. Plan to let the WIBL run after installation, pull the SD card, and check for proper function using the appropriate python scripts. 12. After installation is complete, send participant a Box folder link and make sure they can upload to it. Ask them to not delete items. ##### **Preparing a WIBL for field installation** 1. Start Visual Studio Basic with PlatformIO. 2. Build the library (check mark at bottom of PlatformIO). 3. Open WIBL box to access board. 4. Connect USB to serial pin. 5. The board should indicate it’s on with a green and blue light. - Attach a jumper cable on the “PROG” header pins. - Attach a jumper cable to one of the “RESET” header pins. - Touch the jumper cable to the other “RESET” header pin. - The lights on the board should go out. - Remove the jumper from one of the “RESET” header pins. - Remove the jumper from the “PROG” header pins. 6. You should now be in PROG mode to download new firmware and edit metadata – no lights will be on the board. 7. If updating firmware, select Upload and allow program to run. 8. After completing the download and/or metadata edits, touch the jumper to the other “RESET” header pin briefly again to reboot the logger. 9. Remove the jumper from the “RESET” header pins. 10. Open a new terminal window.  11. Connect the WIBL to Wi-Fi. 12. Run the following commands in the Serial Monitor window: - While attached to the logger, use the `configure` command to make sure that the webserver is configured on; you should see a line that says `webserver on` followed by three numbers. If this is not the case, configure it 'on' with `webserver on 20 5 5`. - Take note of the SSID and password for the Access Point (AP) WiFi network from the `configure` command output. Set them with commands `ssid ap name` and `password ap name` if they are not set (they will default to 'wibl-config' and 'wibl-config-password' otherwise). - Make sure that the WiFi is set to access point mode in the `configure` output. Use the `wireless accesspoint` command if this is not the case. - Reboot the logger with `restart`. - Connect your development computer to the SSID noted above, with the associated password. If you're monitoring the serial output of the logger, you should see information messages indicating that an IP address has been assigned to your computer. Typically, it's 192.168.4.2. - Start the desktop GUI with `python main.py` in the DesktopUI directory in the distribution, or through VSCode. Note that you may need some requirements beyond those installed for the main WIBL Python package to make this run. - Note that since firmware 1.4.0, the logger has a compiled-in configuration that will turn on web server by default with a well-known SSID and password; see LoggerFirmware/src/boot\_config.json and the LoggerFirmware/src/json2cstring.py 13. Edit config/metadata as needed. 14. Make sure to Set Logger and Save Config. # Collecting metadata When installing data loggers, it is important not only to focus on the data that is being collected, but also the metadata. This allows managers to receive and use the most accurate data possible. Certain logger providers, such as Orange Force Marine, include detailed metadata forms in their installation instructions. CSB program managers are encouraged to adopt their own ways of collecting and maintaining metadata records and are referred to the [IHO’s B-12 Edition 3.0.0 Guidance to Crowdsourced Bathymetry](https://iho.int/uploads/user/pubs/bathy/B_12_CSB-Guidance_Document-Edition_3.0.0_Final.pdf) document for details on required and suggested metadata fields for CSB data.